Recover Inaccessible DigitalOcean Droplet
Messing up with server configuration is easier than one may think. While most issues can be solved by ssh-ing into the server and reversing whatever ill-fated commands that were executed, sometimes, the misconfiguration can leave you with a server you can’t access at all. Examples include: boot failures, firewall that blocks important ports, or as in my case, ssh deamon that won’t start.
Such failures might require you to restore the VM to a previous snapshot. However, if you don’t have one, you might be out of luck. Luckily, if you are using DigitalOcean, there’s a way to restore the VM without using a snapshot. The rest of the post describes the process.
Steps to recover the Droplet
-
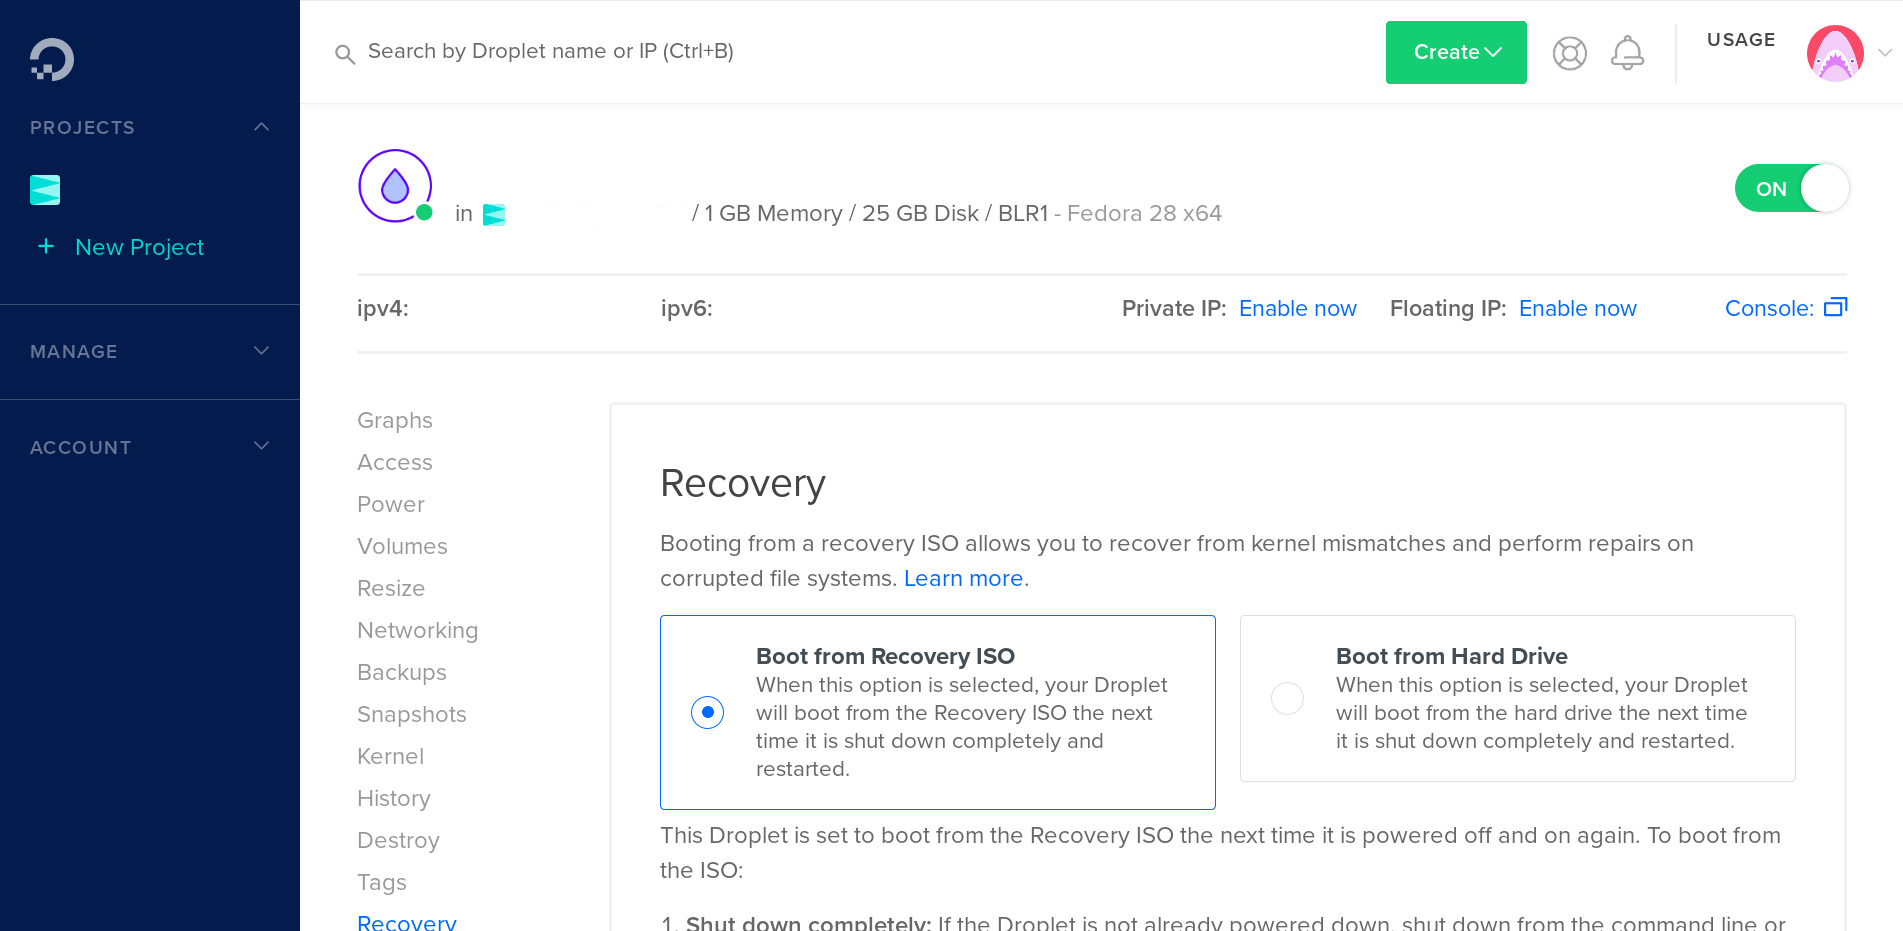
Login to your DO account and go to the specific droplets page.
-
There, go to the recovery menu.
-
Select the option, “Boot from Recovery ISO”
-
After this, poweroff and boot up the droplet. You can use the on/off toggle in the upper right area.
-
ssh into the droplet. As it has booted into the recovery ISO, and not the regular one, you would be able to do so irrespective of previous issues. However, while trying to ssh you might get an error as such,
ssh user@example.com
@@@@@@@@@@@@@@@@@@@@@@@@@@@@@@@@@@@@@@@@@@@@@@@@@@@@@@@@@@@
@    WARNING: REMOTE HOST IDENTIFICATION HAS CHANGED!     @
@@@@@@@@@@@@@@@@@@@@@@@@@@@@@@@@@@@@@@@@@@@@@@@@@@@@@@@@@@@
IT IS POSSIBLE THAT SOMEONE IS DOING SOMETHING NASTY!
Someone could be eavesdropping on you right now (man-in-the-middle attack)!
It is also possible that a host key has just been changed.
The fingerprint for the ECDSA key sent by the remote host is
SHA256:<some key here>.
Please contact your system administrator.
Add correct host key in /home/<user>/.ssh/known_hosts to get rid of this message.
Offending ECDSA key in /home/<user>/.ssh/known_hosts:1
ECDSA host key for example.com has changed and you have requested strict checking.
Host key verification failed.
This occurs due to change of OS. You can either add the new key to known_hosts, or delete the earlier one. Then try to ssh again.
-
This time, you’ll be greeted by this message
--------------------------------------------------------------------

DigitalOcean Recovery Environment 18.04.1 (Zesty Zona)

This image has been mounted by the DigitalOcean Support Team.
When you have completed your work in the recovery environment
update your support ticket to request that your droplet be booted
to it's disk.

This rescue environment is based on Ubuntu 18.04.

--------------------------------------------------------------------
Last login: Mon Jan  1 11:01:10 1000

The DigitalOcean Rescue Console may be accessed remotely
when using a terminal session manager. To enter the rescue
menu, run one of the following programs:
    * screen
    * tmux
    * byobu
You can choose either of the three, viz, screen, tmux, or byobu. I prefer tmux.
-
After choosing tmux, you’d be shown this message
    --------------------------------------------------------------------

    DigitalOcean Recovery Environment 18.04.b (Bionic Betta)

    This droplet is booted to the DigitalOcean recovery environment.
    When you are finished, you may set your Droplet to boot from
    the local disk again via the DigitalOcean control panel.

    This rescue environment is based on Ubuntu 18.04.

    * Network access and SSH have been enabled automatically *
    * SSH Host keys will NOT match while using this rescue system *

    Root Password has been randomly set to:
      153e-dea7-2256-1fb3
    You are strongly encouraged to use SSH keys. To import your SSH
    public keys:
      From Github:        ssh-import-id gh:<Github user name>
      From Launchpad.net: ssh-import-id lp:<launchpad user name>
    --------------------------------------------------------------------

    1. Mount your Disk Image [Not Mounted]
    2. Check Filesystem
    3. Reset Droplet Root Password
    4. Configure Keyboard
    5. Attempt to 'chroot' into installed system
    6. Interactive Shell [/bin/bash]
    Choose (1-6) and press Enter to continue.
Select option 1 to mount your existing OS partition. The option 1 will change to something like this,
1. Unmount your Disk Image [/dev/vda1]Then select option 5 to chroot into the installed system.
-
At this point, you have chrooted into your system. You should see the following message,
-------------------------------------------------------------------------
WARNING: You have entered your installed system. Any commands you run are
executed from hard disk.

Type 'exit' to return to the rescue menu
-------------------------------------------------------------------------
-sh: /opt/digitalocean/recovery.sh: No such file or directory
[user@example /]#
Execute whatever command you need to fix things up. Then exit.
-
Select option 6, “Interactive shell”. The only reason I needed to do this is to poweroff the droplet. Use
poweroffcommand to power off the droplet.Ubuntu 18.04 LTS \n \l Entering Interactive Shell /bin/bash. To return to the menu, type exit and press ENTER. [* Rescue *] example:/opt/digitalocean# -
Back in the DigitalOcean menu, set the recovery option back to “Boot from harddrive”. Power on the machine, and ssh as usual. You should be able to access your droplet again!